Photos are printed on photo paper
using special printers
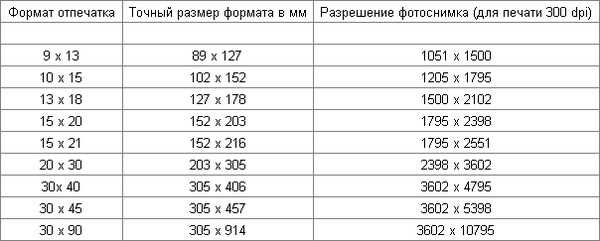
– inkjet or less commonly laser. We also all know that there are certain popular photo sizes. But what are the standard photo sizes for printing? Let’s put them in a table in which we list all the sizes of photographs for printing.
Quite often, when we decide to print our pictures, we encounter a problem and ask ourselves: what size should they be? Of course, most modern digital cameras automatically select the required photo resolution, but it also happens that you need to print photos downloaded from the Internet or captured on your phone, what to do in this case?
First, let’s answer the question – why should you know (and accordingly adhere to) standard photo sizes for printing? The fact is that having come up with standard photo sizes
, photographic paper began to be made in the same size. Therefore, the correct ratio of the height and width of the photograph is very important. Otherwise, the photos will end up stretched both in height and width. The resolution of the image is also important – it affects the quality (sharpness) of the image when printed.
Photo sizes for printing are shown in the table
Where there is a standard or format, this is the aspect ratio that it is advisable to adhere to so that you do not have to crop or stretch the photo. The second column contains the photo sizes in centimeters, the third in pixels, I think this is understandable.
Standard sizes
The photos have dimensions of 10.2 x 15.2 cm (highlighted in the table) – these are the usual album photos that we are used to seeing.
What to do if the photo has different dimensions?
Let’s say you compared the sizes of photographs for printing, the table of which was presented above, and found out that your photo has different sizes, what should you do in this case? If the aspect ratio is different, then simply increasing or decreasing the centimeters will not do. You will have to crop the image to the desired format.
How to quickly crop a photo to the desired size?
There are two main ways.
The first way is to use the simplest image editing program. Almost all versions of the Windows operating system have the Paint program
in the “Standard Programs” tab. Having opened a photo file in this program, you need to drag the border of the picture on the right or bottom and thus crop the photo to the desired size in pixels. The image size in pixels is shown at the bottom of the program window.
The second way is to use specialized image editing programs. Most often they use the Photoshop program
– she is the most popular and the most professional. I note that we need to precisely adjust the photo to the desired format (depending on the version of the program, the location of this button may change – just squeak it on the toolbar).
Select in the upper field the desired size ratio for the photo, according to the table of photo sizes for printing.
Now, with the right mouse button, move the image so that the part of the photo we need appears in the selected field. Finally, by double-clicking on the selected area, we crop the photo to the size we need. Don’t forget to save the resulting image. It is now ready to be printed on an inkjet or laser printer.


