Origami as a technique for creating figures from paper appeared in Japan a thousand years ago. The statue of the goddess of mercy, Kanon, was decorated with colorful figures and asked for her protection. Over time, origami lost its religious significance. They were used to decorate the interiors of houses, folk festivals, and carnivals. Today this art attracts adults and children, since with the help of paper you can recreate figures of birds, animals, and so on with your own hands

How to make an origami bird
There are different design techniques, many executions of the same object or image. Simplified options are suitable for beginners or children, more complex ones for professionals. How is the expected result achieved?
When constructing origami from paper, characteristic features appear and vivid details of craftsmanship stand out. Then the image is obtained with new features in a simplified angular form. This is due to the technical feature of origami: folding and folding shapes in a certain sequence. Despite the highly simplified appearance, a child or adult can recognize the image of the craft and add the missing elements in their imagination. Such figures develop fantasy, imagination and spatial thinking. They are suitable for children’s games or performances.
Let’s look at paper birds as an example.
We need:
- Colored pencils, pens, felt-tip pens (for drawing details).
- Glue (for gluing additional parts at the end);
- Paper (plain or colored, not thick);
- Scissors;
Most trades are created from a square or rectangular shape by successive actions and bends.
Pay attention to the image quality. Precision, careful folding and sanding, as well as the choice of white color and paper thickness are important. Therefore, when working with children, it is necessary to gradually move from simple to complex, increasing the sequence of folds and other techniques. In the future, it will be possible to disassemble the professional execution of the figures.

Step-by-step instructions with diagram
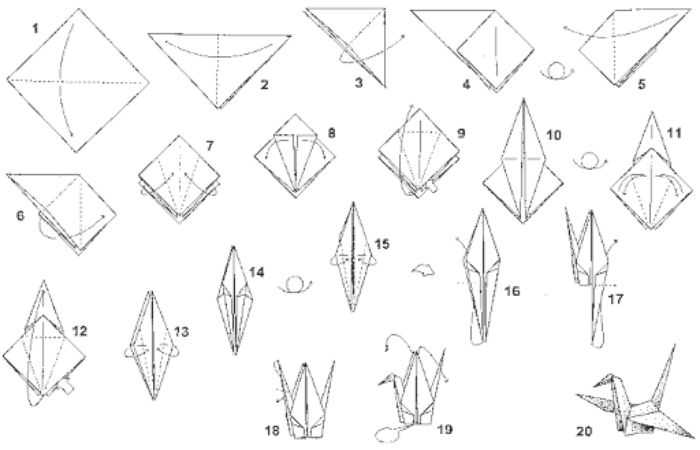
The most popular origami symbol in Japan is the crane. The bird is considered a divine guide and blessing. According to legend, to satisfy your deepest desire, you need to make 1000 taps.
Scheme of performance “Crane with flapping wings”:
- Cut out a square and fold the sheet in half diagonally.
- We do the same thing vertically.
- Straighten the top triangle into a square.
- Let’s look at the opposite.
- Fold the triangle to the right.
- Align the corner into a square.
- Fold the side corners towards the center from the top side.
- Fold the corners.
- Open the square at the top, in the direction of the center line.
- Turn it over to the other side and fold it towards the center.
- Fold the top side up along the fold lines.
- Bend the lower right end inward.
- Fold at the left end.
- Bend the left tip inward.
- Fold the wings obliquely and spread them to the sides.
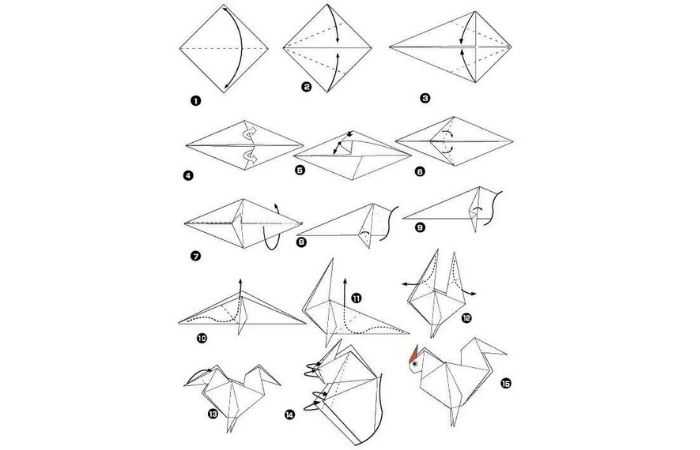
“Cockerel” performance pattern:
- Cut out a square, make a diagonal fold and fold the corners along the fold line.
- Fold over half of the template.
- Make an up-down curve.
- Fold inside.
- Make a “hat” fold.
- We bend the corners on both sides.
- Make folds inward.
- Fold it on both sides inside the figure.
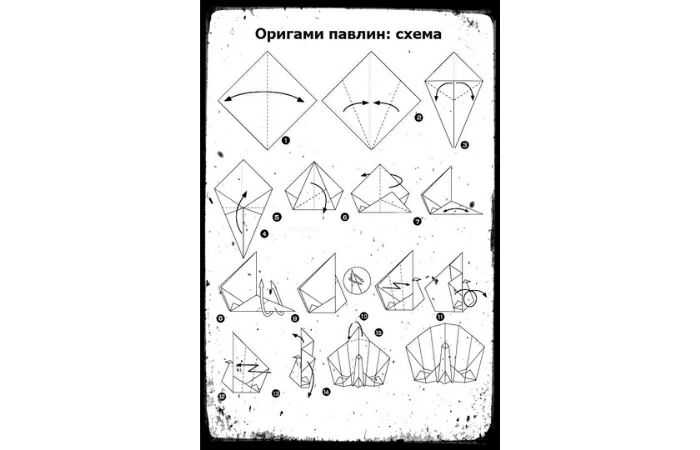
“Peacock” execution pattern:
- Cut out a square and make a diagonal curve.
- Fold along the fold line.
- Let’s summarize.
- Fold the corner inward.
- Bend inward again.
- Making the head (bending it inward).
Columba execution scheme:
- Cut out the square, fold it and fold it diagonally.
- Fold both corners along the dotted line.
- Fold the top corner along the dotted line.
- Fold the figure in half.
- Fold the “wings”.
- We make a “head” by bending the corner inward.
- The dove is ready, let’s paint the details.
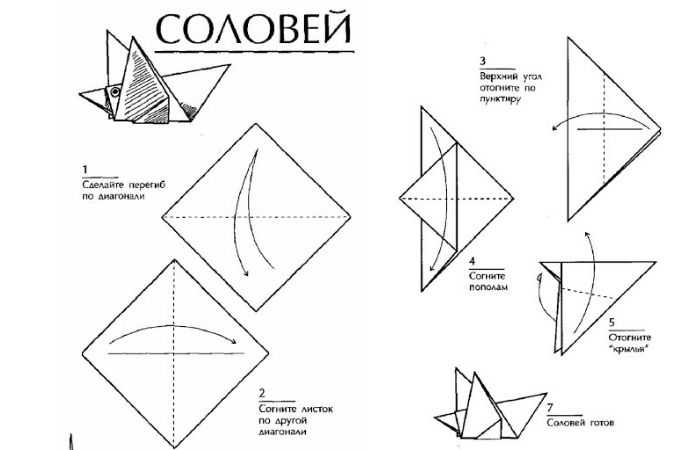
Scheme of performance of “The Nightingale”:
- Cut out a square and make a diagonal curve.
- Fold the sheet along a different diagonal.
- Fold the top corner along the dotted line.
- Fold in half.
- The nightingale is ready, add details.
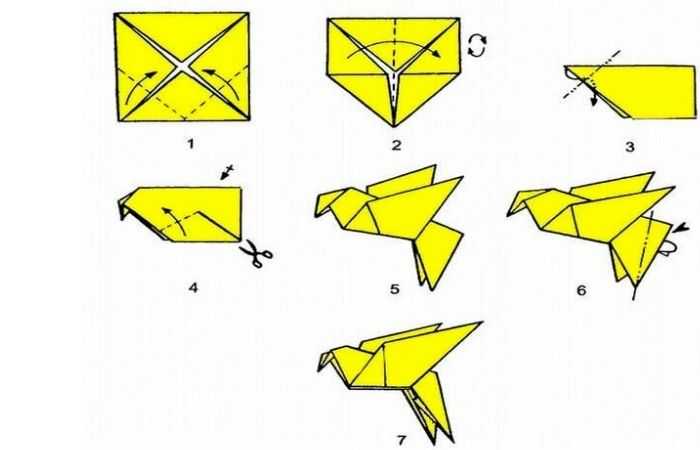
“Bird” execution pattern:
- Cut out the square.
- Fold vertically and horizontally, unfold and fold four corners to the center.
- Fold the two corners on the left side towards the center of the square.
- Fold the shapes in half horizontally.
- Hide the corner inside.
- Make a cut and fold two wings.
- The tail can be bent inward.
- It turned out that it was a bird with a tail.

“Heron” performance pattern:
- Fold the square along the diagonal axis.
- We do the same vertically.
- Turn the top triangle into a square.
- Let’s look at the opposite side.
- From the reverse side, fold the triangle to the right side.
- Straighten the corner into a square.
- Fold the top layer of the side corners towards the center.
- Put them back.
- Expand the top level of the bend.
- Turn the piece over.
- Make bends towards the center.
- Fold the top layer up along the fold lines.
- We direct the upper side corners to the center.
- Rev.
- Fold the side corners of the top layer towards the center.
- Fold the bottom left corner inward and upward.
- Make a fold inward.
- We fold both wings obliquely.
- Cut out the bottom part.
- Bend one leg inward.
- Let’s make another fold inward on it.
- On your other leg, lean inward.
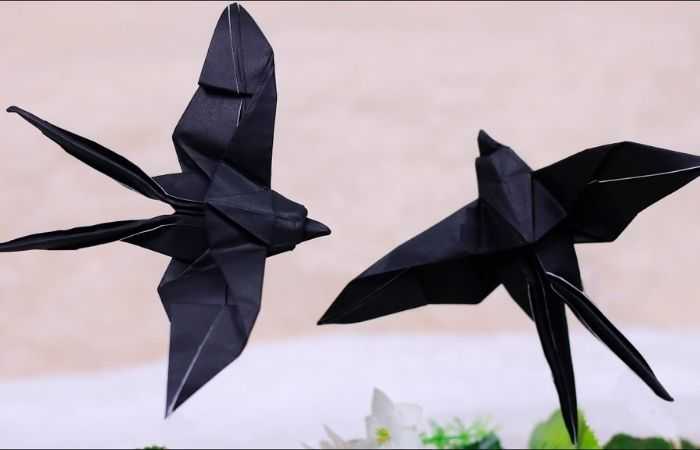
Scheme of execution of “Swallow”:
- Cut out a square and fold the sheet diagonally.
- Fold along the vertical axis.
- Straighten the upper triangle into a square.
- Turn around and throw the triangle to the right.
- Straighten the corner into a square.
- Fold the top layer of the side corners towards the center.
- We are returning them.
- Fold the top layer up along the fold lines.
- Flip the piece over.
- Make bends towards the center.
- Unfold the top layer along the fold line.
- Fold the side corners of the top layer towards the center.
- Rev.
- Fold the side corners of the top layer towards the center.
- Let’s turn the sectors upside down.
- Bend the upper corners inward.
- Make a step fold for the top layer.
- Fold the top corner so that it protrudes slightly
- Rev.
- Trim the tail.
- Lay out the ends.

Scheme for completing “Gluttonous Raven”:
- Cut out a square, fold it diagonally and fold the corners towards the center.
- Fold the corners back.
- Fold in half.
- Fold in half again.
- Bend the upper sector to the right.
- We do this from the other side too.
- Straighten the corners and add volume.
- Take out the beak.
- The crow is ready.


Symbols on origami diagrams
An origami diagram is a sequence of educational drawings. To understand the actions, standard notations are used:
- The dotted line is the invisible line.
- Simple line, fold line.
- Main line – indicates the edge of the sheet.
- “Mountain” – the line along which you should deviate from yourself (arrow – direction of the fold).
- “Valley” is a line along which you need to bend towards yourself. And an arrow indicating the direction of the fold.

Origami birds photo

The origami technique is interesting and easy to perform. Enchants and develops imagination.
More interesting articles about paper:
 Объемные игрушки оригами своими руками – подробное описание как сделать бумажные поделки
 Энергосберегающие технологии производства бумаги
 Как сделать тапки своими руками
 Тонкая листовая сталь – тонкая холоднокатаная листовая сталь, 5 букв, 1-я буква Ж, сканворд
 Стоимость крафт-бумаги в Туле. Низкие цены на фото. доставка по россии
 How to clean a frying pan from carbon deposits, without difficulty.
 Выбираем фотобумагу для принтера
 Моделирование инерцоида Толчина